
From Nigel's Kitchen Table
Strawberry Linzer Biscuits
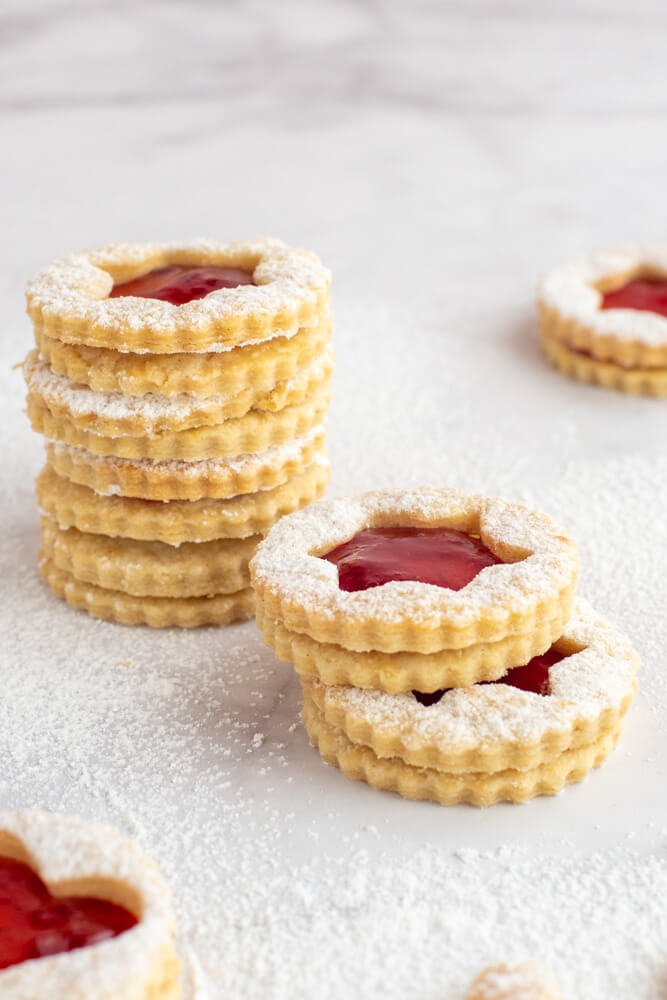
Buttery Linzer biscuits sandwiched with strawberry jam, with a delicate cut-out top that lets the filling shine through.

Navigate the recipe
On this page
The recipe, step by step
These strawberry Linzer biscuits remind me of the beautiful jam-filled biscuits I enjoyed when I was young. Two delicate, buttery biscuits are sandwiched together with strawberry jam, while a small shape cut from the top lets the bright red filling glint through.
A light dusting of icing sugar gives them an elegant finish, but one of the things I love most about these biscuits is how easy they are to personalise. Cut hearts into the centres for Valentine’s Day, use stars or bells at Christmas, or keep things simple with circles and diamonds at any time of year.
They are also a lovely recipe to make with children, who can help roll the dough, choose the shapes and assemble the cooled biscuits.
For an extra-special filling, try my Strawberry & Elderflower Jam. And if you enjoy Linzer-style biscuits, my Chocolate Linzer Biscuits are filled with chocolate ganache instead.
Recipe Highlights
- Ease: Easy to make, with plenty of opportunities to customise the shapes and filling.
- Taste: Rich, buttery vanilla biscuits with sweet strawberry jam.
- Texture: Delicate and crisp when freshly assembled, gradually becoming softer as the jam settles into the biscuits.
- Serving: Lovely with tea or coffee and pretty enough for gifting or celebrations.
- Quantity: 14 assembled biscuits.
- Preparation: 30 minutes.
- Baking: 16 minutes.
- Chilling: 1 hour.
- Total time: 1 hour 46 minutes.
Why You’ll Love These Strawberry Linzer Biscuits
The biscuit dough itself is wonderfully simple. Butter, icing sugar, egg yolks and vanilla create a rich, delicate dough without the need for any raising agents.
Chilling the dough gives it time to firm up before rolling, making it much easier to cut clean shapes. Better still, the prepared dough can be kept refrigerated for up to five days, so you do not have to make and bake everything on the same day.
Once baked, the fun really begins. You can change the centre cut-outs to suit the occasion and use different jams, lemon curd or chocolate spread for the filling.
And while strawberry jam gives these biscuits their beautiful jewel-like red centres, the basic dough works with all sorts of flavours.

Ingredients and Substitutions
Linzer Biscuit Dough
- Butter: Use 200 g butter. Softened butter creams smoothly with the icing sugar and helps give the biscuits their rich, delicate texture.
- Icing sugar: Use 80 g icing sugar, also known as powdered sugar, plus a little extra for dusting the biscuit tops before assembly.
- Egg yolks: Use 2 medium egg yolks, 40 g in total. They add richness and help bind the dough.
- Vanilla: Use 1 teaspoon pure vanilla extract or ½ teaspoon vanilla paste. Vanilla works particularly well with the butter and strawberry filling.
- Plain flour: Use 250 g plain flour, also known as all-purpose flour. Avoid adding unnecessary extra flour, as too much can make the biscuits dry or tough.
- Fine sea salt: Add 1 pinch fine sea salt. A small amount balances the sweetness and enhances the butter, vanilla and fruit flavours.
Filling
- Strawberry jam: Use 8 teaspoons strawberry jam. A thicker jam is easier to sandwich between the biscuits without it running out around the edges. For a homemade version, try my Strawberry & Elderflower Jam.
Nigel recommends
Vanilla Bean Paste
For the vanilla glaze, Nielsen-Massey vanilla bean paste adds a rich, concentrated vanilla flavour with visible vanilla seeds, and only a small amount is needed.
 Ingredient
Nielsen Massey
Vanilla Bean Paste
Rich vanilla bean paste with a concentrated vanilla flavour and visible vanilla seeds, ideal for cakes, biscuits, custards, creams and glazes.
Some retailer links may be affiliate links. Recommendations remain editorially independent.
How to Make Strawberry Linzer Biscuits
Make and Chill the Dough
1. Cream the butter and sugar: In a large mixing bowl, cream the butter and icing sugar together. Gradually beat in the egg yolks, vanilla and salt.
2. Add the flour: Add the flour and gently bring everything together until a soft dough forms. Avoid overworking the dough, as this can make the biscuits tough once baked.
3. Chill the dough: Divide the dough into two equally sized discs. Wrap each one tightly in cling film and refrigerate for 1 hour. The dough can also be kept in the refrigerator for up to 5 days.
Prepare for Baking
4. Preheat the oven: Once the dough has rested, preheat the oven to 160°C fan / 350°F / Gas 4.
5. Let the dough soften slightly: Remove both pieces of dough from the refrigerator and leave them on the kitchen worktop for about 10 minutes, or a little longer if your refrigerator is particularly cold.
6. Prepare the trays: Line 2 baking trays with baking paper or silicone baking mats.
Roll and Bake the Biscuit Bases
7. Roll the first dough: Unwrap one disc of dough, place it on a lightly floured work surface and roll it to approximately 0.5 cm / ¼ inch thick.
8. Cut the biscuit bottoms: Using your chosen cutter, cut as many biscuit bases as possible. I have made these with both 4 cm / 1½-inch cutters and larger 6 cm / 2½-inch cutters. Transfer the cut-outs to one prepared tray, gather the scraps and continue rolling and cutting until you have used the first piece of dough.
9. Bake the bottoms: Bake the first tray for 8–10 minutes, or until the edges are just beginning to turn golden brown. Leave them on the baking tray for 5 minutes, then transfer them to a wire rack and allow them to cool completely.
Make the Biscuit Tops
10. Shape the tops: Repeat the rolling and cutting process with the second piece of dough to make the top halves of the biscuits. Cut a smaller decorative shape from the centre of each top so that the filling will show through. Hearts are lovely for Valentine’s Day, while stars or bells work beautifully at Christmas. If a small cut-out refuses to release, use a cocktail stick to help. Gather any offcuts with the remaining scraps and use them to make a few extra biscuits. On a warm day, refrigerate the cut biscuits on their baking tray for 10 minutes before baking to help them retain their shape.
11. Bake the tops: Bake the second tray for 8–10 minutes, as with the first tray, then cool completely.
Assemble the Linzer Biscuits
12. Fill and assemble: Dust the cooled biscuit tops with icing sugar. Place approximately ½ teaspoon strawberry jam on each whole biscuit base and spread it slightly. Finish by placing one dusted cut-out biscuit on top.

Variations
Nutella
Fill the biscuits with a thin layer of chocolate hazelnut spread for a richer variation.
Do not add too much, as the filling can squeeze out when the biscuits are sandwiched together.
Raspberry Jam
Raspberry jam gives the biscuits a slightly sharper fruit flavour that works beautifully with the sweet, buttery dough.
Apricot Jam
Apricot jam has a bright, gently tangy flavour and makes a lovely alternative to strawberry.
Lemon Curd
Lemon curd turns these into fresh, citrusy Linzer biscuits.
Because lemon curd generally needs refrigeration, follow the storage instructions for the curd you use.
Make Chocolate Linzer Biscuits
For a completely different version, try my Chocolate Linzer Biscuits, made with cocoa biscuit dough and chocolate ganache.
Choose Different Shapes
Changing the centre cut-out is one of the easiest ways to adapt these biscuits for different occasions.
- Hearts: Valentine’s Day.
- Stars, trees or bells: Christmas.
- Flowers: Spring celebrations.
- Circles or diamonds: Everyday baking.
Keep the outer cutter the same for both halves so that the finished biscuits fit together neatly.
Nigel’s Recipe Tips
Use Properly Softened Butter
The butter should be soft enough to cream smoothly with the icing sugar but not melted or greasy.
Very cold butter will be difficult to cream properly, while overly warm butter can make the dough too soft.
Avoid Overworking the Dough
Once you add the flour, bring the dough together gently and stop as soon as it forms a soft dough.
Working it unnecessarily can develop more gluten and make the finished biscuits tougher.
Give the Dough Its Full Chilling Time
The dough needs 1 hour in the refrigerator before rolling.
This firms the butter and makes the dough much easier to roll and cut cleanly.
Let Very Cold Dough Rest Before Rolling
Straight from a cold refrigerator, the dough may be too firm and prone to cracking.
The WPRM method gives it about 10 minutes on the worktop before rolling, with a little longer if necessary.
Roll to an Even Thickness
Aim for approximately 0.5 cm / ¼ inch throughout.
An even thickness helps all of the biscuits bake at a similar rate.
Chill the Cut Biscuits on Warm Days
If the dough becomes warm while you are rolling and cutting it, place the prepared biscuits in the refrigerator for 10 minutes before baking.
This helps preserve the decorative shapes.
Watch the Edges Rather Than the Clock Alone
Bake the biscuits for 8–10 minutes and look for the edges to just begin turning golden.
They will continue to firm as they cool, so avoid baking them until they are deeply coloured.
Dust the Tops Before Assembly
Dust the cut-out biscuit tops with icing sugar before placing them over the jam.
That way, the bright filling remains clean and visible through the centre.
Don’t Overfill Them
About ½ teaspoon of jam per biscuit is enough.
Too much can squeeze out around the edges as you add the top biscuit.

Frequently Asked Questions
What Are Linzer Biscuits?
Linzer biscuits are sandwich-style biscuits with a filling between two layers. The top biscuit has a decorative cut-out so that the filling shows through.
Can I Use a Different Jam?
Yes. Strawberry, raspberry and apricot jam all work well.
Choose a filling that is reasonably thick so that it stays neatly between the biscuits.
Can I Make the Dough Ahead?
Yes. The WPRM recipe states that the wrapped dough can be kept in the refrigerator for up to 5 days.
Why Did My Biscuits Spread?
The dough may have become too warm before baking.
On warm days, refrigerate the shaped biscuits on their baking tray for 10 minutes before putting them in the oven.
Why Is My Dough Cracking When I Roll It?
Very cold dough can be difficult to roll.
Leave it at room temperature for about 10 minutes, or slightly longer if necessary, before trying again.
Do I Need Special Linzer Cutters?
No. You can use ordinary round or decorative biscuit cutters for the outer shapes and any smaller cutter you have for the centres.
Even the end of a suitable piping nozzle can work for a simple circular opening.
Can Children Help Make Them?
Yes. Children can help roll the dough, cut the shapes, choose the centre designs, dust the cooled tops and assemble the biscuits.
Adults should handle the oven and hot baking trays.
How Do I Keep Linzer Biscuits Crisp?
For the crispest texture, store the baked biscuits without their filling and assemble them nearer to serving.
Once filled with jam, moisture gradually passes into the biscuits and makes them softer.
Tools You’ll Need
- Electric hand mixer or stand mixer
- Large mixing bowl
- Rolling pin
- Two baking trays
- Baking paper or silicone baking mats
- Round or decorative biscuit cutters
- Smaller cutters for the centres
- Cocktail stick for stubborn small cut-outs
- Teaspoon
- Fine-mesh sieve for dusting
- Wire cooling rack
Storage and Freezing
Storing the Dough
The wrapped biscuit dough can be prepared in advance and kept in the refrigerator for up to 5 days.
Storing the Baked Biscuits
These Linzer biscuits are at their best on the day they are assembled, while the biscuits are still crisp.
Keep filled biscuits in an airtight container for 3–4 days. They will gradually soften as moisture from the jam moves into the biscuits.
For a crisper result, store the unfilled biscuit halves separately and add the jam closer to serving.
Freezing
The baked biscuits can be frozen without the jam, although the original recipe notes that they may not be quite as crisp as freshly baked biscuits once defrosted.
Allow them to cool completely before freezing and add the filling after they have fully defrosted.
Nutrition
Serving: One 4 cm strawberry Linzer biscuit.
% Daily Values based on a 2,000-calorie diet
Nutrition information is provided as an estimate and may vary depending on the ingredients and portion size used.
Strawberry Linzer Biscuits
INGREDIENTS LIST
Biscuits:
- 200 g butter
- 80 g icing sugar (US powdered sugar) (plus extra for dusting the biscuits)
- 2 medium egg yolks (40g total)
- 1 tsp pure vanilla extract or 1/2 tsp of vanilla paste
- 250 g plain flour (all-purpose)
- 1 pinch fine sea salt
Filling:
- 8 tsp strawberry jam
Preparation
- Biscuits: In a large mixing bowl, cream the butter and sugar together. Gradually beat the egg yolks, vanilla and salt into the butter mixture.
- Add the flour and gently bring it together until the mixture forms a soft dough. Try not to overwork the dough, as it will become tough when baked.
- Divide the dough into two equally sized discs. Wrap each piece tightly in cling film and place in the fridge for 1 hour. You can keep it in the fridge for up to 5 days.
- Once the dough has rested, preheat the oven to 160°C fan / 350°F / Gas 4 .
- Remove the two pieces of dough from the fridge and leave them to rest on the kitchen worktop for 10 minutes or longer if your fridge is very cold.
- Line 2 baking trays with baking paper or with silicone mats.
- Rolling the dough: Unwrap one of the doughs and place it on a lightly floured work surface and roll out to a thickness of about 0.5cm (¼ inch).
- Shaping the bottoms: Using a cutter of your choice, cut out as many biscuit bottoms as you can from the doughI made two sizes of biscuits, a 4cm (1½ in) cutter and a 6cm (2½ in) cutter for larger biscuits.Transfer the cutouts onto one of the baking trays. Then gather your scraps and repeat the process until you've used all the dough from the first dough.
- Baking bottoms: Bake the first tray of biscuits for 8 to 10 minutes, or until the edges are just beginning to turn golden brown. Let them cool for 5 minutes on the baking sheet, then transfer to a wire rack to cool completely.
- Shaping the tops: Repeat the process with the second dough to make the top half of the biscuits. Once you have your cutouts, choose a cutter to remove the centre of the biscuit. This will show off the filling in your biscuits. You can change the center cutout to match a theme, such as a heart shape for Valentines.If the shape you’re stamping out doesn’t come out, use a cocktail stick to help.Add any offcuts to the other scraps of dough and roll out a couple of extra biscuits. If it is a warm day, put the biscuits in the fridge on the baking tray for 10 minutes to ensure they retain their shape during baking.
- Baking tops: Repeat the baking of the second tray of biscuits for 8 to 10 minutes as with the first.
- Assembly: Dust the biscuit tops with icing sugar. Using a teaspoon, place a small dollop of strawberry jam on the biscuit bottoms. Place ½ tsp of jam onto the center of each bottom biscuit, spreading it slightly. Top with the dusted tops.
FROM MY KITCHEN TO YOURS
Made this recipe?
I would love to hear how it turned out. Leave a comment and add a star rating to help other home cooks discover the recipe.

A recipe worth keeping
Save this recipe for another day
Pin it to one of your boards and keep it close for the next time you are ready to cook or bake.
Save to PinterestKeep cooking
You may also like
 Recipe
Chocolate Chia Pudding
A creamy vegan chocolate chia pudding topped with rich hazelnut fudge sauce for a simple, satisfying dessert or breakfast.
View recipe Recipe
Lemon Crinkle Cookies
Soft lemon crinkle cookies with snowy cracked tops and a bright, refreshing citrus flavour.
View recipe Recipe
Coffee & Walnut Loaf Cake
A moist coffee and walnut loaf cake finished with a smooth espresso and vanilla glaze.
View recipe
Around the table
Questions and kitchen notes
Made this recipe? Leave a rating and tell me how it turned out. Your questions and tips may also help the next person making it.