From Nigel's Kitchen Table
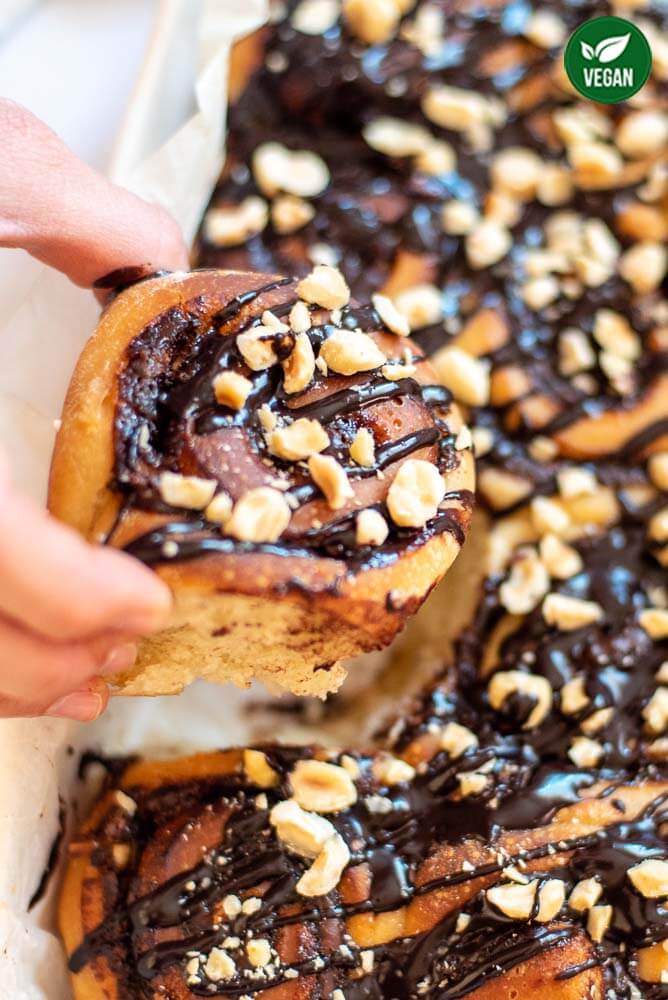
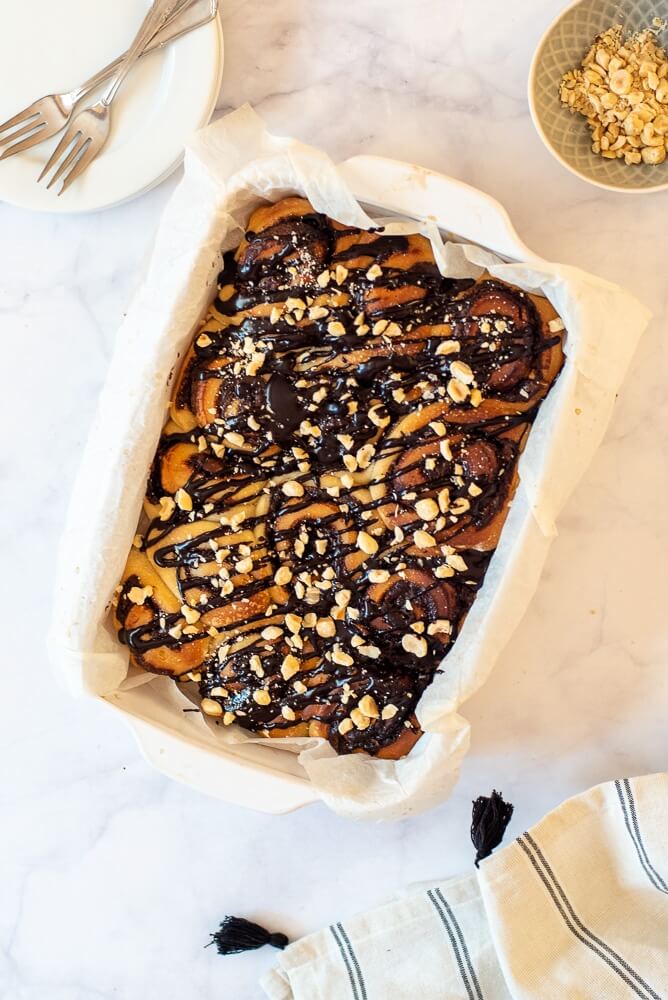
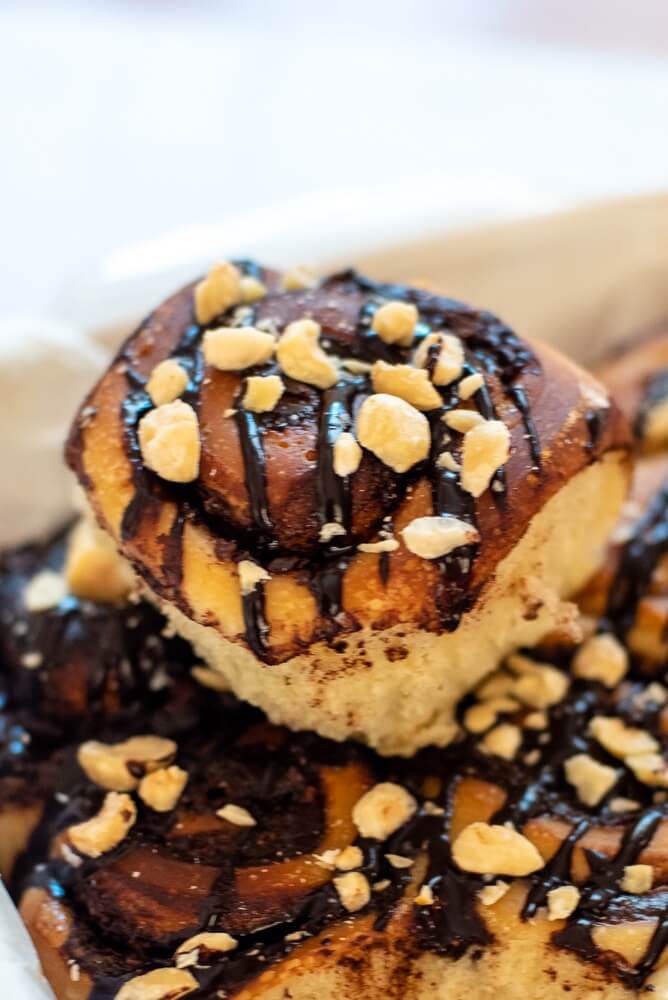
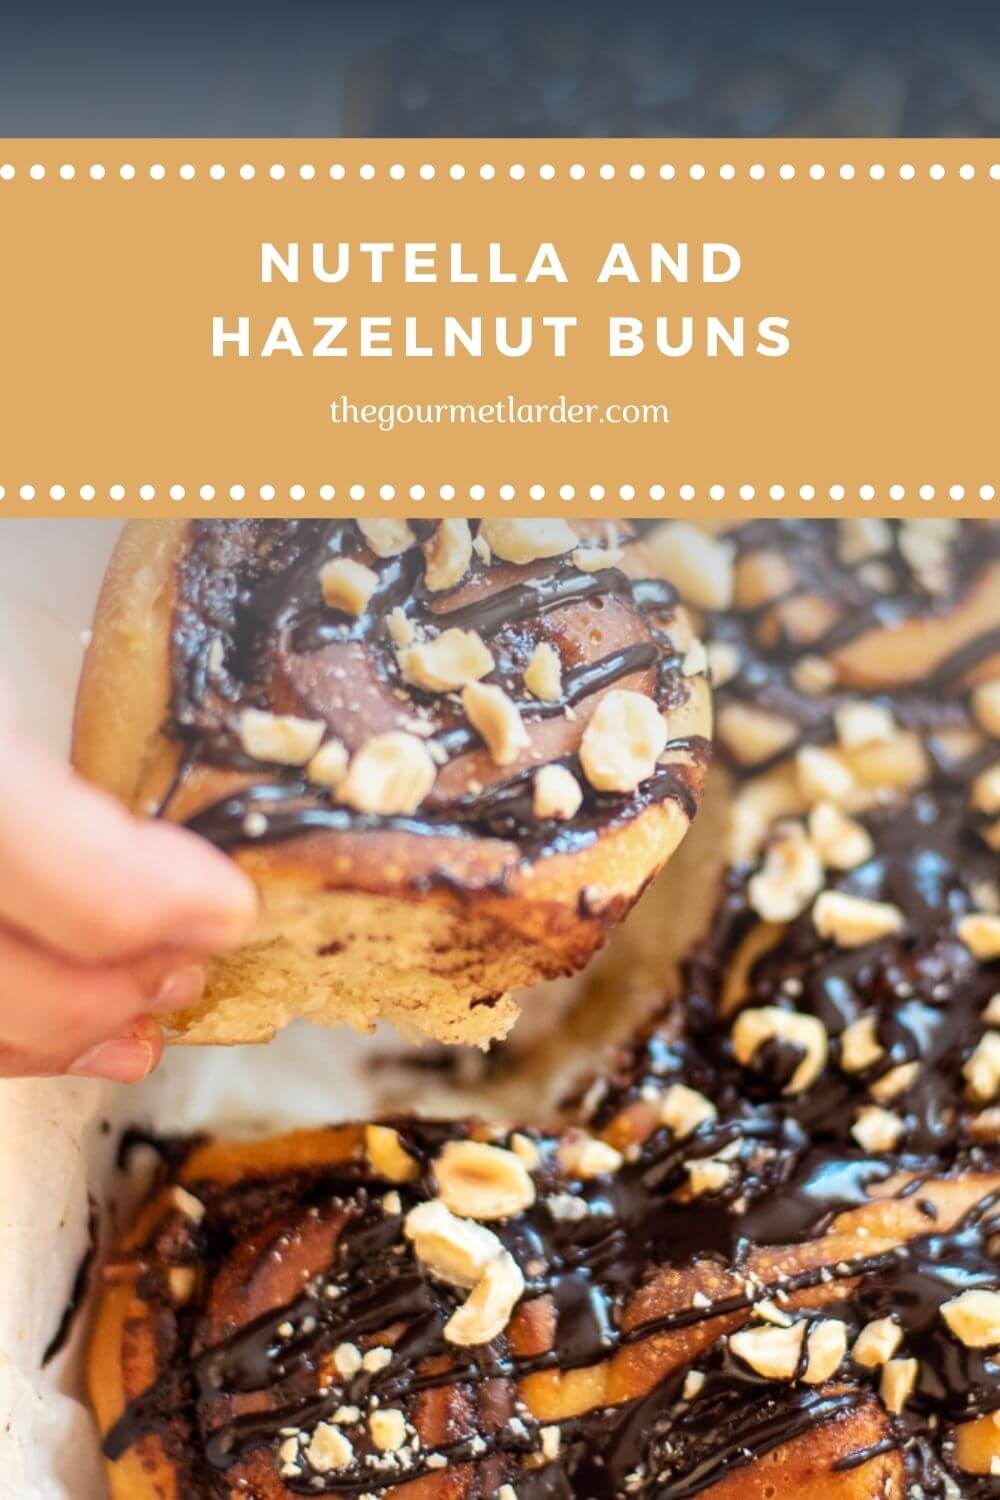
Nutella And Hazelnut Buns
Soft sweet buns filled with homemade Nutella and finished with rich chocolate icing and roasted hazelnuts.
Navigate the recipe
On this page
The recipe, step by step
These Nutella and hazelnut buns are filled with my delicious homemade Nutella and topped with rich chocolate icing and hazelnuts.
These buns, or rolls as they are known in America, just like the popular cinnamon rolls, are easy to make and get rave reviews from my family. Another great thing about this recipe is it is not just vegan but dairy-free and egg-free.
And you can also get vegan versions of Nutella in the shops now, so if you don’t have the time or the equipment, it couldn’t be simpler.
If you want to enjoy these freshly baked for breakfast, I have included an overnight method in the recipe.
RECIPE HIGHLIGHTS
- EASE: easy to intermediate, some knowledge of kneading is required, or you can use a stand mixer.
- FREE FROM: dairy-free and vegan.
- TASTE: sweet, chocolaty and nutty.
- TEXTURE: chewy, soft, tender and sticky.
- QUANTITY: 12 buns
- TIME: 2 hours 25 minutes
INGREDIENTS
For this Nutella and hazelnut bun recipe all you need are these ingredients:
- Non-dairy milk (such as almond, oat, rice or soy milk) – adds flavour and replaces regular cows milk typically used in this type of recipe.
- Neutral-tasting oil (coconut, vegetable or sunflower oil) – creates moisture, makes the cake light and lengthens the cakes life span.
- Fresh or dried yeast– ferments the sugars in the flour and releases carbon dioxide, but because the dough is elastic and stretchable the carbon dioxide cannot escape, causing the dough to rise.
- Strong white bread or all-purpose flour – is made from hard, high-protein varieties of wheat, which have a higher gluten content than other flours. Gluten is the substance that makes the dough more elastic and stretchable, giving the final baked product its fluffiness and lightness.
- Caster or granulated white sugar – adds sweetness and structure.
- Vegan homemade Nutella – adds the ultimate rich nutty chocolate flavour we all crave.
Chocolate spread recommendations– Nutella hazelnut chocolate spread, Biona Organic Duo Chocolate Hazelnut Spread.
- Whole hazelnuts – adds texture and flavour.
- Pure vanilla extract or paste – to enhance the flavour.
- Vanilla – I use Taylor & Colledge vanilla products, they add a delicious taste to your recipes and enhance the other ingredient flavours: pure vanilla extract, vanilla paste or vanilla pods.
- Powdered / Icing sugar – creates the ultimate shiny glaze when combined with the chocolate.
- Cocoa powder – adds a rich chocolate flavour and builds structure.
Cocoa recommendations: Dr. Oetker fine dark cocoa powder or not as dark – Sevenhills wholefoods organic cacao powder
- Salt – I highly recommend adding salt to your doughs and pastry. Salt helps balance out the sweetness and richness. It also elevates the other ingredients, bringing out the best characteristics of any recipe. I recommend using sea salt, Maldon Sea salt flakes or Cornish sea salt.
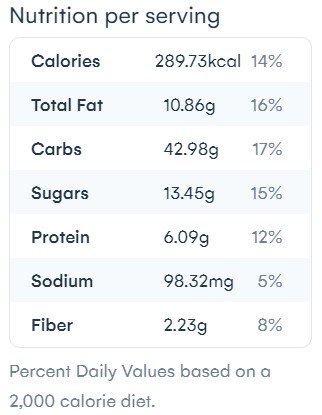
NUTRITION
Serving: one Nutella and hazelnut bun
STORAGE AND FREEZING
These Nutella and hazelnut buns will stay fresh in an airtight container for 2 days at room temperature, especially if you warm them up a bit before serving.
Freezing: They also freeze well for up to 2 months, but are best frozen without the icing. To defrost simply leave on the kitchen worktop for half an hour and glaze as per recipe.
EQUIPMENT SUGGESTIONS
For this recipe, it is optional to use a stand mixer, but it can easily be made without one.
I like the sturdiness of this bowl and its 4-litre capacity means I can use it for mixing just about everything in the kitchen. It is also microwave, freezer, and dishwasher safe.
These different size mixing bowls are really useful depending on the amount of food you are preparing. They also have airtight lids that fit snugly to seal and keep food fresh, great for using as dry storage bowls with lids. The plastic lid of the largest bowl has a removable centre, where one of 3 graters can be used for grating cheese or vegetables.
I love this rolling pin, its variable guide rings make rolling out biscuit doughs, pizzas, or flat breads so much easier!
This small pan is a great size for boiling small amounts of liquids and it has pouring lips built into the rim of the saucepan which makes it easy to use.
Ideal pan for tray bakes, brownies and flapjacks.

RECIPE TIPS
When heating the plant-based milk make sure that it is not too hot (ideal temperature is body temperature at 37°C/98°F), you should be able to comfortably put your finger in it and hold it there. If its too hot it will kill the yeast.
Use an extra sharp knife or a piece of cotton thread, when cutting the individual buns, otherwise the dough gets squashed, and the filling runs out.
Be extra careful not to over bake the buns as it results in them drying out.
Nutella & Hazelnut Buns – Revision
INGREDIENTS LIST
Dough
- 250 g non-dairy milk (almond, oat, rice or soy milk)
- 15 g fresh yeast (5g dried yeast)
- 50 g neutral-tasting oil (vegan butter, coconut, vegetable or sunflower oil)
- 450 g white bread flour
- 60 g caster sugar (4 tbsp)
- 1/2 tsp fine sea salt
Filling
- 130 g vegan nutella or homemade
Topping
- 40 g icing sugar (US powdered sugar)
- 150 g unsweetened cocoa powder
- 2 tsp non-dairy milk (almond, oat, rice or soy milk)
- 20 g whole roasted hazelnuts (chopped )
Preparation
- Dough: In a small saucepan, place the milk and oil, heating gently until it reaches body temperature 37°C/98°F. You should be able to comfortably put your finger in it and hold it there. If it's too hot it will kill the yeast.
- Remove from the heat and stir in the yeast. Set aside until needed.
- In a large bowl, mix together the flour, sugar and salt, then make a well in the middle and add the milk mixture. Using a wooden spoon or electric mixer, combine all the ingredients until they form a rough dough.
- Tip the dough out onto an un-floured surface (you shouldn’t need to add extra flour as this will make the dough too dry) and knead it for about 10 minutes. It will be sticky at first but become smooth and elastic as you knead it.
- If, like me, you’re too lazy, you can also place the dough into an electric stand mixer until it’s smooth and elastic.
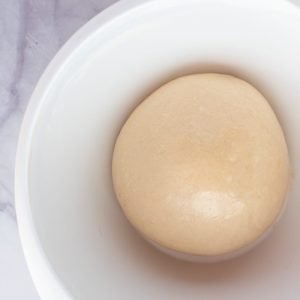
- Once kneaded, shape the dough into a ball and place it in an oiled bowl. Cover and set aside to rise for about 1-2 hours in a warm place, until doubled.
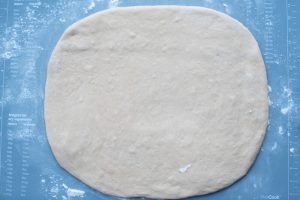
- Shaping: Once the dough has proved and doubled in size, turn out the bowl and place the dough on a clean work surface that has been lightly dusted with flour. Punch it down and knead briefly. Then roll it out to a 30x40cm (12×16 inch) rectangle.
- Line or grease a 30x20cm (12×8 inch) baking dish with vegan butter.
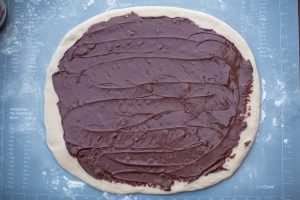
- Assembly: Spread the Nutella filling across the rectangle of dough. I find it best not to overdo the filling, otherwise, it oozes out when rolling it up.
- Roll up the dough starting with one of the longer sides, so you end up with a long rolled sausage shape.
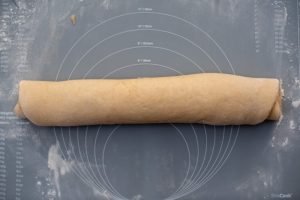
- Use a sharp knife or a piece of cotton thread to cut the dough into 12 equal buns. If you are using a piece of cotton thread, wrap it around the sausage shape dough and pull the ends in opposite directions to cut the dough.
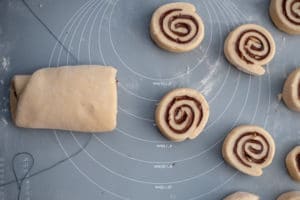
- Arrange cut side down on the prepared baking tray or dish. It is ideal if they are not too far spaced apart, so that when they have proved the sides of the buns touch each other (this avoids them dryig out and being tough).

- Overnight choice: At this stage, the buns can be placed in the fridge overnight and continue in the morning. The next morning, remove the rolls from the fridge. Put your oven on its lowest setting, the ideal temperature is 30°C/ 86°F, and put the baking dish or tray into the oven for 20-25 minutes so they prove. Then after proving, remove them from the oven and rest on the side, while you preheat the oven to 180°C fan / 400°F / Gas 6.Once the oven is preheated, continue to follow the instructions below from baking!
- Second proving: Cover with a damp tea towel and leave to proof again for 30 minutes.
- Preheat the oven to 180°C fan / 400°F / Gas 6.
- Baking: Place the buns in the preheated oven for 20-25 minutes. I like to cover the dish with a piece of foil for the first 10 minutes, to avoid them getting too much colour.
- Leave to cool in the tin for 30 minutes then carefully lift them out and place on a wire rack.
- Glazing: Sift the icing sugar and cocoa into a small bowl and gradually stir in the plant milk until it forms a thick pourable icing. Drizzle over the cooled buns.
FROM MY KITCHEN TO YOURS
Made this recipe?
I would love to hear how it turned out. Leave a comment and add a star rating to help other home cooks discover the recipe.
A recipe worth keeping
Save this recipe for another day
Pin it to one of your boards and keep it close for the next time you are ready to cook or bake.
Save to PinterestKeep cooking
You may also like
 Recipe
Lemon Crinkle Cookies
Soft lemon crinkle cookies with snowy cracked tops and a bright, refreshing citrus flavour.
View recipe Recipe
Coffee & Walnut Loaf Cake
A moist coffee and walnut loaf cake finished with a smooth espresso and vanilla glaze.
View recipe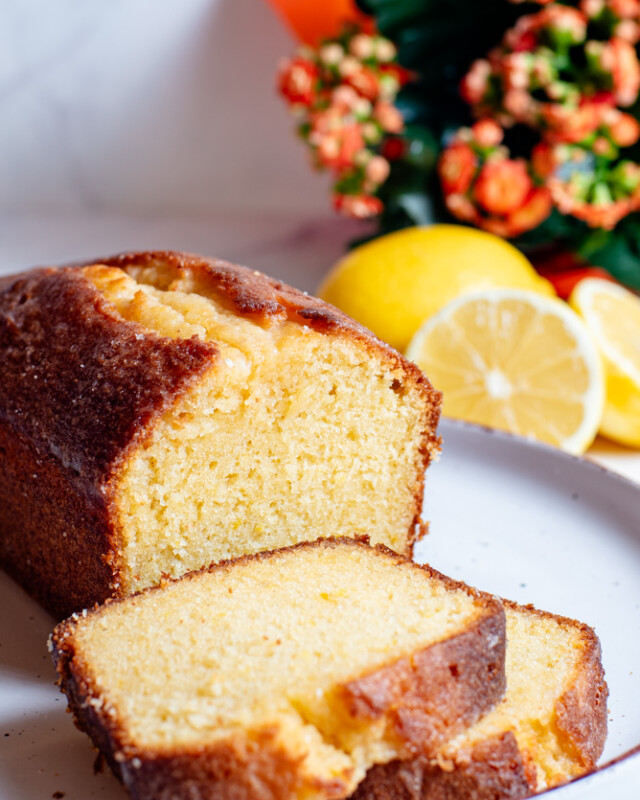 Recipe
Lemon Drizzle Cake
A moist buttery sponge soaked with bright lemon syrup and finished with a sweet citrus glaze.
View recipe
Around the table
Questions and kitchen notes
Made this recipe? Leave a rating and tell me how it turned out. Your questions and tips may also help the next person making it.