
From Nigel's Kitchen Table
How to Line a Springform Pan
This quick method makes lining a springform pan easy, with no tracing or carefully cutting a paper circle to fit the base.
Navigate the recipe
On this page
The recipe, step by step
Lining a springform pan does not need to involve tracing around the base and carefully cutting out a perfect circle of baking paper.
There is a much quicker method: place a sheet of baking paper over the loose base, secure the outer ring around it and trim away the excess.
It takes less than a minute and gives delicate cakes, cheesecakes and other bakes additional protection against sticking to the base of the pan. It also makes transferring the finished bake to a serving plate much easier.
What you’ll learn
- The easiest way to line a springform pan
- When to line only the base
- When to line the sides as well
- Whether the pan and paper should be greased
- How to remove a delicate cake safely
- How to prevent batter from leaking
What is a springform pan?
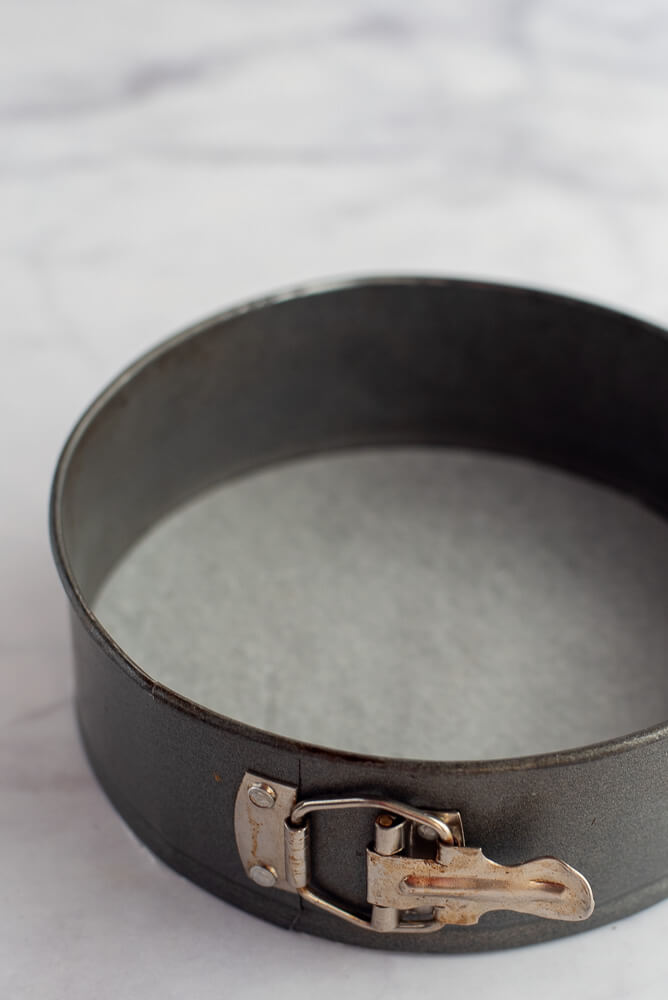
A springform pan is made from two separate pieces:
- A removable circular base
- An outer ring with a fastening clip
Opening the clip releases the ring so it can be lifted away from the cake without turning the cake upside down.
This makes springform pans particularly useful for delicate bakes that are difficult to invert, including cheesecakes, flourless cakes and deep tarts.
What you need
- A springform pan
- Baking parchment or baking paper
- Scissors
- Butter, oil or non-stick spray when required
Make sure you are using baking parchment rather than waxed paper. Waxed paper is not designed for normal oven baking.
The quickest way to line the base
Step 1: Separate the pan
Open the clip on the side of the pan and remove the circular base from the outer ring.
Place the base flat on your worktop.
Step 2: Add the baking paper
Tear off a square of baking paper slightly larger than the base.
Lay it flat over the base. There is no need to trace or cut out a circle beforehand.

Step 3: Attach the outer ring
Place the outer ring over the paper-covered base.
Fasten the clip securely, trapping the baking paper between the base and the ring. Check that the paper lies reasonably flat inside the pan.

Step 4: Trim the excess paper
Use scissors to trim the baking paper around the outside of the pan.
You can leave a small border around the base or trim it close to the edge.

Your springform pan is now ready to use.
Nigel’s Kitchen Tip
Leave a small amount of baking paper visible around the outside of the pan. It makes it easier to check that the paper has remained securely trapped between the base and the ring.
Should I grease the pan before adding the paper?
A light coating of butter or non-stick spray beneath the baking paper can help keep it flat while you assemble the pan.
Whether you should also grease the top of the paper depends on the recipe. Although baking parchment is designed to resist sticking, greasing it provides additional protection for delicate or particularly sticky cakes. When a tested recipe instructs you to grease both the pan and the paper, it is worth following that instruction.
For most cakes, I use this order:
- Lightly grease the pan.
- Add the baking paper.
- Lightly grease the paper when the recipe requires it.
Avoid using so much butter or spray that it pools at the base of the pan.
Do I need to line the sides?
Not every recipe requires the sides to be lined.
Line only the base when:
- The recipe needs to grip the sides as it rises
- The pan has an effective non-stick coating
- The recipe specifically instructs you to line only the bottom
- You plan to loosen the sides with a knife after baking
Line the base and sides when:
- The cake is especially moist or fragile
- The mixture is particularly sticky
- You are making a tall cheesecake or mousse cake
- The recipe specifically calls for a side collar
- You want especially clean, smooth edges
Your Chocolate Fudge Cake, for example, recommends lining the pan because its sponge layers are moist and fragile.
How to line the sides
Cut a strip of baking paper long enough to fit around the inside of the pan.
The strip should be approximately the same height as the pan, or slightly taller when making a deep cake or cheesecake.
Lightly grease the inside edge of the pan. Press the strip against the greased surface, overlapping the ends slightly.
The grease acts as an adhesive and helps keep the paper in place while you add the mixture.
For an especially tall cake, allow the paper to extend above the top edge of the pan. This creates a collar that gives the mixture additional support as it rises.
Should the baking paper go under or over the base?
The baking paper should lie over the removable base, with the edges trapped between the base and the outer ring.
This is quicker than cutting a precise circle and helps keep the paper securely positioned.
Check that the ring has closed properly before adding the mixture. A loose or incorrectly assembled pan may allow thin batter to escape.
Preventing batter from leaking
Springform pans have a removable base, so they are not always completely watertight.
To reduce leaking:
- Assemble the base and ring securely.
- Check that the base is facing the correct way.
- Use a reasonably thick cake mixture.
- Place the pan on a rimmed baking tray before putting it in the oven.
- Avoid relying on the pan alone for very thin or liquid mixtures.
A baking tray will catch any small drips and make the pan easier to move in and out of the oven.
Using a springform pan in a water bath
Cheesecake recipes sometimes use a water bath to provide gentler, more even heat.
Because water may enter through the join between the base and ring, recipes commonly instruct you to wrap the outside of the springform pan securely in foil before placing it into the water.
Use wide, heavy-duty foil where possible so there are no joins below the water level.
Another option is to place the springform pan inside a slightly larger solid cake pan before putting both into the water bath. This keeps the springform pan separate from the water.
Always follow the specific water-bath instructions in the cheesecake recipe you are using.
How to release the cake safely
Allow the cake to cool for the amount of time specified in the recipe before opening the pan.
Then:
- Run a thin, blunt knife or small offset spatula around any unlined edge.
- Release the fastening clip slowly.
- Gently widen the ring.
- Lift the ring straight upwards.
- Slide the cake from the base using the baking paper beneath it.
Do not drag a sharp knife directly across a non-stick pan base, as this may damage its surface.
For very delicate cheesecakes, chill the cake completely before removing it from the base.
Common mistakes
Cutting the paper too small
If the paper does not extend beyond the base, the ring cannot trap it securely.
Begin with a square that is wider than the pan and trim it only after fastening the ring.
Closing the pan unevenly
Check that the base is sitting evenly inside the ring before securing the clip.
An incorrectly positioned base can create a gap and allow batter to escape.
Using too much grease
A thin coating is enough. Excess grease may pool around the base or affect the cake’s exterior texture.
Opening the pan too early
A warm cheesecake or flourless cake may still be very fragile.
Follow the cooling instructions and chill the bake first when required.
Forgetting to loosen unlined edges
Even a non-stick pan can hold onto small areas of cake.
Carefully loosen the edge before releasing the clip so that the cake does not tear.
Using a springform pan for very thin batter
The seam around the base may allow thin mixtures to leak.
Use a solid cake pan unless the recipe has specifically been tested in a springform pan.
Frequently asked questions
Can I use greaseproof paper instead of baking parchment?
Use a product that is clearly labelled as suitable for baking.
Baking parchment has a non-stick, heat-resistant surface. Some products labelled only as greaseproof paper may not perform in the same way, so check the packaging.
Do I need to line a non-stick springform pan?
Not always, but lining the base gives additional protection and makes transferring the finished cake easier.
It is particularly useful for moist, sticky or delicate bakes.
Can I line the pan with aluminium foil?
Foil can help protect the outside of a springform pan during a cheesecake water bath, but baking parchment is usually better for lining the surface that touches the cake.
Foil may crease and stick to delicate bakes.
Can baking paper extend above the pan?
Yes. This is useful when making a tall cake or cheesecake.
Make sure the paper does not touch an exposed oven heating element.
Why is my springform pan leaking?
The base may be incorrectly positioned, the fastening clip may not be fully closed or the mixture may be too thin for the pan.
Place the springform pan on a rimmed baking tray to catch any small drips.
Should I remove the baking paper before serving?
Yes, where practical.
Once the cake is fully cool and stable, slide it from the pan base onto a serving plate and carefully pull the paper away. For very delicate cheesecakes, leaving the paper underneath until serving may be safer.
Put it into practice
- The Best Carrot Cake
- Chocolate Fudge Cake
- No-Bake Espresso Chocolate Cheesecake
- Rhubarb Marzipan Cake
- Flourless Chocolate Cake
Continue learning
- Oven Temperature Conversions: Celsius, Fahrenheit, Fan and Gas Mark
- Fresh Yeast vs Dry Yeast: What’s the Difference?
Recommended Springform Pans
For reliable results, choose a sturdy springform pan with a tight-fitting base and a secure clip. These three sizes cover most cakes and cheesecakes.
This section contains affiliate links. I may earn a small commission at no extra cost to you.
Best for smaller cakes, deep cheesecakes and recipes designed for an 8-inch pan.
23 cm Springform Pan — My Recommended Size
The most versatile size for everyday baking and the springform pan I recommend buying first.
Best for larger cakes, celebration bakes and recipes designed for a 10-inch pan.
Join Nigel’s Kitchen Table
Dependable recipes, practical kitchen knowledge and seasonal inspiration.
Join Nigel’s Kitchen Table for new recipes, helpful Kitchen Notes and seasonal ideas delivered directly to your inbox.
Unsubscribe at any time. Your details will never be shared.
Keep cooking
You may also like
 Kitchen note
Fresh Yeast vs Dry Yeast: What’s the Difference?
Fresh, active dry or instant yeast? This simple guide explains how each type works, how to substitute one for another…
Read the note Kitchen note
Oven Temperature Conversions: Celsius, Fahrenheit, Fan and Gas Mark
Oven Temperature Conversions: Celsius, Fahrenheit, Fan and Gas Mark
Read the note
Around the table
Questions and kitchen notes
Made this recipe? Leave a rating and tell me how it turned out. Your questions and tips may also help the next person making it.