
From Nigel's Kitchen Table
No-Bake Mango Coconut Cheesecake
A refreshing no-bake mango and coconut cheesecake that is light, creamy and easy to prepare.
Navigate the recipe
On this page
The recipe, step by step
This no-bake mango coconut cheesecake is light, creamy and wonderfully refreshing, with plenty of tropical flavour from fresh mango and coconut. A buttery biscuit base is topped with a smooth mango mascarpone filling, followed by a delicate coconut layer and fresh mango decoration.
I love a traditional baked cheesecake, but sometimes I want something a little easier. With this recipe, there is no water bath, no worrying about cracks and no risk of overbaking. Instead, most of the work is simply giving the cheesecake enough time in the fridge to set properly.
The combination of mango and coconut keeps the filling fresh and fruity, while mascarpone gives it a silky richness without making the cheesecake feel overly heavy. Better still, it can be made ahead, which makes it particularly useful when friends are coming over or you’re preparing for a party.
If you enjoy mango desserts or cheesecakes, you might also like my mango passion fruit cake, blueberry cheesecake bars or strawberry couscous cheesecake.
Recipe Highlights
- Ease: Easy and completely no-bake.
- Taste: Creamy mango and coconut with a sweet, buttery biscuit base.
- Texture: Smooth mango mascarpone filling with a firm biscuit crust and delicate coconut topping.
- Quantity: 10 servings.
- Pan: 23 cm / 9-inch springform pan.
- Preparation: 20 minutes.
- Chilling: 3 hours.
- Total time: 3 hours 20 minutes.
Why You’ll Love This Mango Coconut Cheesecake
This is a particularly useful cheesecake when you want something impressive without spending hours in the kitchen. There is no baking involved, and each stage is straightforward.
Fresh mango gives the filling its natural fruitiness, while coconut milk adds a mellow tropical flavour. Meanwhile, mascarpone gives the cheesecake its smooth, creamy texture.
It is also an excellent make-ahead dessert. In fact, allowing plenty of chilling time is essential, so preparing it in advance works very much in your favour.
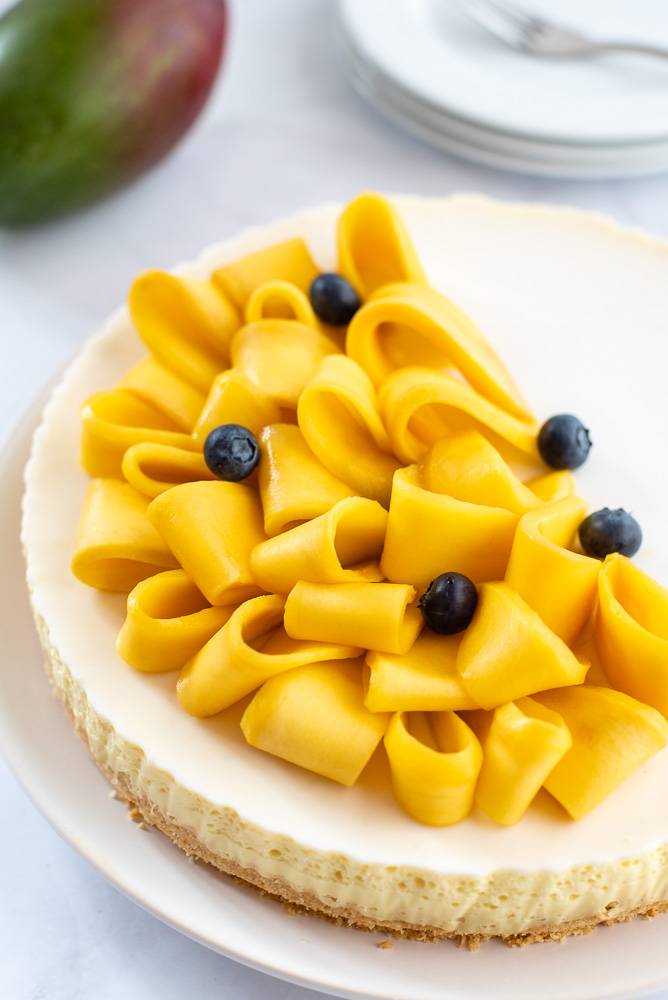
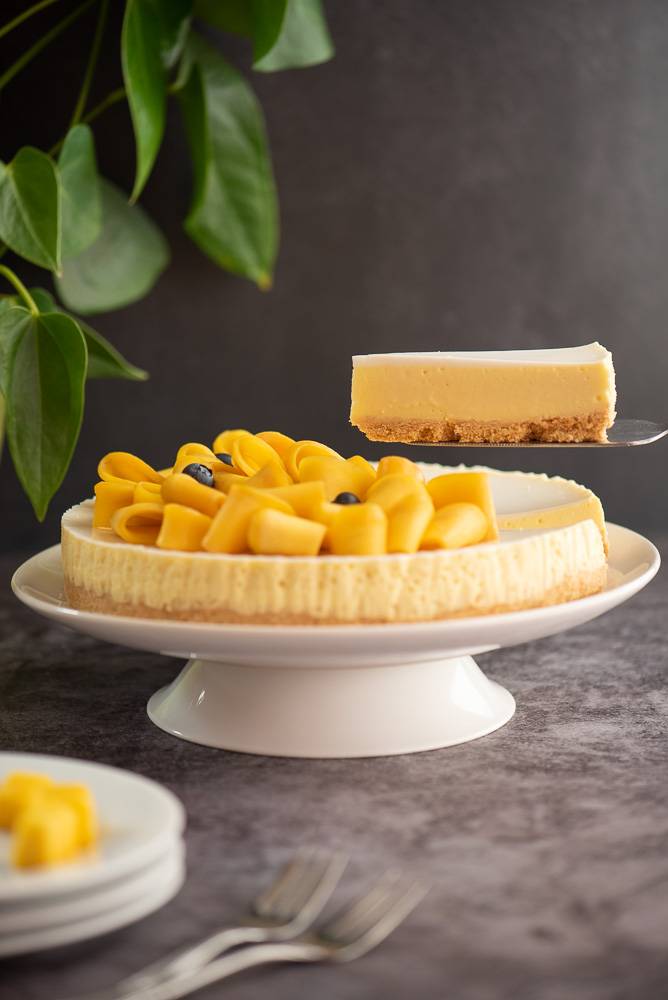
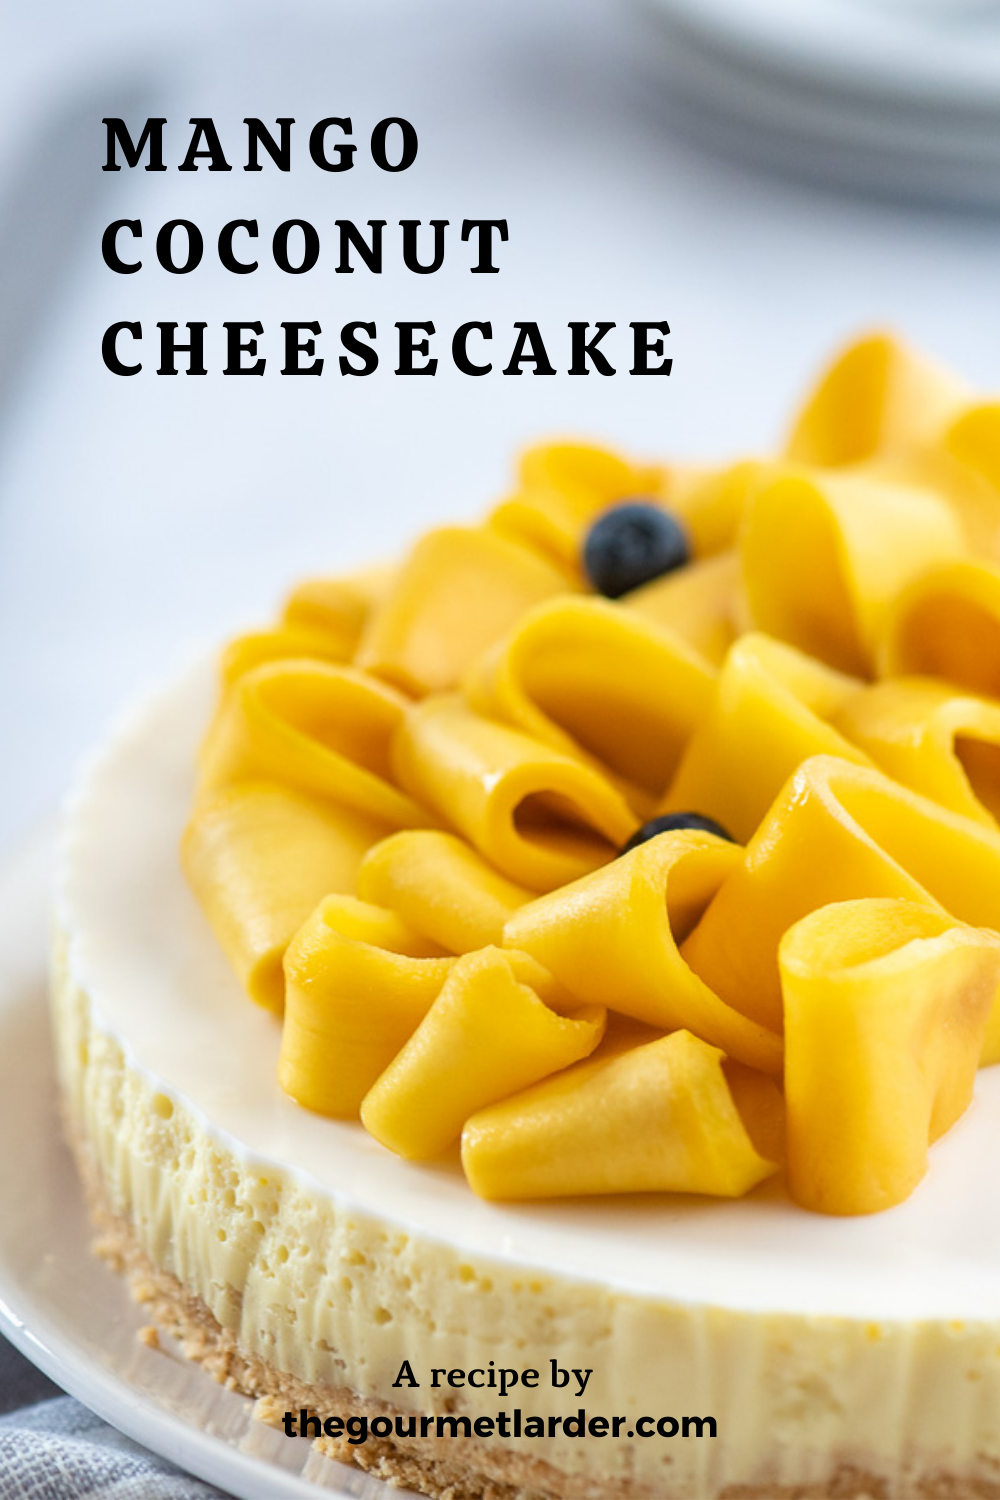
Finally, you can keep the decoration as simple or elaborate as you like. Folded mango slices create the ribbon effect shown in the photographs, while diced mango and a few fresh mint leaves make an equally attractive but much quicker finish.
Ingredients and Substitutions
Biscuit Base Ingredients
- Butter: Use 100 g melted butter. It binds the biscuit crumbs together and gives the base a rich, buttery flavour.
- Digestive or coconut biscuits: Use 200 g digestive or coconut biscuits. Digestives give you a classic cheesecake base, while coconut biscuits reinforce the tropical flavour of the filling.
Mango Mascarpone Filling Ingredients
- Mango: Use 250 g mango, approximately 1 large mango. Fresh ripe mango gives the filling its characteristic fruity flavour.
- Lemon juice: Add 1 tablespoon lemon juice. Its acidity helps brighten the mango and balance the sweetness.
- Coconut milk: You need 1 × 400 ml can of coconut milk in total. Use 300 ml in the cheesecake filling and reserve the remaining 100 ml for the coconut topping.
- Mascarpone: Use 250 g mascarpone for a smooth, creamy filling.
- Caster sugar: Use 60 g caster sugar to sweeten the mango filling without overpowering the fruit.
- Vanilla: Use 1 tsp pure vanilla extract or ¼ tsp vanilla paste. Vanilla rounds out the mango and coconut flavours without competing with them.
Nigel recommends
Vanilla Bean Paste
Nielsen-Massey vanilla bean paste works beautifully in this cheesecake, adding a rich, rounded vanilla flavour that complements the mango and coconut without overpowering them.
 Ingredient
Nielsen Massey
Vanilla Bean Paste
Rich vanilla bean paste with a concentrated vanilla flavour and visible vanilla seeds, ideal for cakes, biscuits, custards, creams and glazes.
Some retailer links may be affiliate links. Recommendations remain editorially independent.
- Gelatine: Use 6 gelatine sheets for the cheesecake filling. The recipe notes also give 1 × 7 g packet of powdered gelatine as the alternative. Because gelatine products can vary, always check the manufacturer’s instructions as well.
Coconut Topping and Decoration
- Coconut milk: Use the remaining 100 ml coconut milk from the 400 ml can.
- Gelatine: Use 1 gelatine sheet or ½ tsp powdered gelatine for the coconut topping.
- Fresh mango: Use 1 large mango, sliced or cut into chunks, for decorating the cheesecake if you wish.
- Mint: Use approximately 6 mint leaves or tips as an optional finishing touch.

How to Make No-Bake Mango Coconut Cheesecake
Make the Biscuit Base
1. Crush the biscuits: Melt the butter in a small saucepan or microwave. Meanwhile, place the biscuits in a mini food processor or sealed food bag and crush them until they resemble coarse breadcrumbs.
2. Combine the base: Place the crushed biscuits in a bowl, pour over the melted butter and mix until evenly combined.
3. Prepare the tin: Line a 23 cm / 9-inch springform pan with baking or parchment paper to help prevent the cheesecake from sticking.
4. Press in the biscuit base: Pour the biscuit mixture into the prepared pan. Using the back of a spoon or the base of a flat-bottomed glass, press it down firmly to create an even layer.
5. Chill the crust: Place the pan in the fridge while you prepare the cheesecake filling.
Make the Mango Mascarpone Filling
6. Soak the gelatine: Place the gelatine sheets in a small bowl of cold water and leave them to soak for 5–6 minutes.
7. Prepare the mango: Peel the large mango and remove the stone.
8. Blend the mango: Place 250 g mango flesh and 1 tablespoon lemon juice in a blender. Alternatively, use a hand blender in a large bowl and blend until smooth.
9. Add the remaining filling ingredients: Add 300 ml coconut milk, mascarpone, caster sugar and vanilla to the mango. Blend or mix again until you have a smooth mixture. Keep the remaining 100 ml coconut milk for the topping.
10. Warm part of the filling: Pour approximately 250 ml, or about a cup, of the mango mixture into a small saucepan and gently heat it. Do not allow it to boil.
11. Add the gelatine: Remove the soaked gelatine from the water and squeeze out any excess. Once the mango mixture is hot, remove the saucepan from the heat and stir in the gelatine until completely dissolved.
12. Combine the filling: Add the warm gelatine mixture back into the remaining mango mixture, then blend or stir until thoroughly combined.
13. Fill the cheesecake: Remove the springform pan from the fridge and pour the mango mascarpone filling over the chilled biscuit base.
14. Chill until set: Return the cheesecake to the fridge and chill for 2–3 hours, or until the filling is set.
Make the Coconut Topping
15. Soak the gelatine: Once the cheesecake filling has set, soak 1 gelatine sheet in a small bowl of cold water for 5–6 minutes.
16. Heat the coconut milk: Gently heat the reserved 100 ml coconut milk in a small saucepan until hot but not boiling.
17. Dissolve the gelatine: Remove the soaked gelatine from the water and squeeze out any excess. Take the coconut milk off the heat, then stir in the gelatine until completely dissolved.
18. Add the topping: Pour the coconut milk mixture carefully over the top of the set cheesecake.
19. Chill again: Return the cheesecake to the fridge for approximately 30 minutes, or until the coconut topping has set.
Decorate the Cheesecake
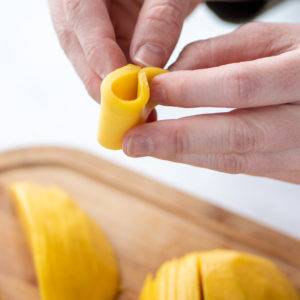
20. Prepare the mango: Peel another mango and slice it in half, avoiding the stone. Cut each half into thin strips.
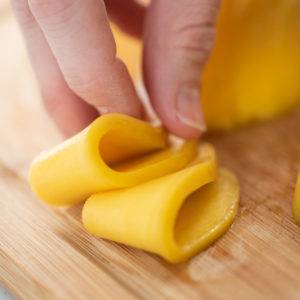
21. Create the mango ribbons: Take a mango slice and gently fold it in half, then arrange it around the edge of the cheesecake. Continue adding slices around and over one another to create the decorative pattern.
22. Keep it simple if you prefer: Alternatively, cut the mango into large cubes and arrange them over the cheesecake. Finish with fresh mint leaves or tips, if using.
Variations
Mango Topping Instead of Coconut
If you would prefer a bright yellow fruit topping rather than the coconut layer, the WPRM recipe notes provide a simple alternative.
Heat 200 ml mango juice or mango smoothie, then use 2 gelatine sheets and follow the same basic method as for the coconut topping.
Change the Mango Decoration
The folded mango ribbons look impressive, but they are certainly not essential.
For an easier finish, simply dice the mango into chunks and arrange them over the top once the cheesecake has set. A few fresh mint leaves add a lovely contrast.
Nigel’s Recipe Tips
Give the Cheesecake Enough Time to Set
Planning ahead is the most important part of this recipe. Although the preparation itself takes only around 20 minutes, the cheesecake needs plenty of time in the fridge.
The filling should chill for 2–3 hours, followed by another 30 minutes after adding the coconut topping. The WPRM recipe therefore gives an overall chilling time of 3 hours.
Don’t Boil the Gelatine Mixture
When warming the mango mixture or coconut milk, heat it only until hot. There is no need to boil it.
Remove the pan from the heat before stirring in the softened gelatine, then mix until it has completely dissolved.
Gelatine Sheets and Powder Are Not Identical
Gelatine sheets and powdered gelatine can behave differently, so always check the instructions on the packet you are using.
For this cheesecake filling, the recipe uses 6 gelatine sheets or one 7 g packet of powdered gelatine.
As a general guide from the recipe notes, that amount will firmly set around 500 ml of liquid, while it will more softly set approximately 750 ml.
Wait Before Decorating
Only decorate the cheesecake once it has set firmly.
Adding heavy pieces of mango too soon can disturb the soft surface or cause them to sink into the topping.
Make the Base Firm
Press the biscuit mixture down well using the back of a spoon or the flat bottom of a glass.
A firmly packed base is much easier to slice and is less likely to crumble when the cheesecake is removed from the tin.

Frequently Asked Questions
How Long Does Mango Coconut Cheesecake Need to Chill?
Allow approximately 3 hours of chilling time in total.
The mango mascarpone filling first needs 2–3 hours to set. After adding the coconut topping, chill the cheesecake for a further 30 minutes.
Can I Make Mango Coconut Cheesecake Ahead of Time?
Yes. In fact, this is an ideal make-ahead dessert because it needs time in the fridge to set before it can be served.
Preparing it in advance also means the cheesecake is ready to decorate shortly before serving.
Can I Use Powdered Gelatine Instead of Gelatine Sheets?
Yes. For the main cheesecake filling, the recipe notes specify 1 × 7 g packet of powdered gelatine as an alternative to 6 gelatine sheets.
For the coconut topping, use ½ tsp powdered gelatine instead of 1 sheet.
Because the strength of different gelatine products can vary, always check the packet instructions as well.
Why Does the Recipe Use 400 ml Coconut Milk?
The recipe uses one standard 400 ml can of coconut milk.
Use 300 ml in the mango mascarpone filling, then keep the final 100 ml for the coconut topping. This means none of the can needs to go to waste.
Can I Use Coconut Biscuits Instead of Digestives?
Yes. The recipe allows either digestive biscuits or coconut biscuits.
Digestives give you a more traditional cheesecake base, while coconut biscuits add another layer of coconut flavour.
Can I Make a Mango Topping Instead of a Coconut Topping?
Yes. For a brighter, fruitier finish, heat 200 ml mango juice or mango smoothie and add 2 gelatine sheets, following the same method used for the coconut topping.
How Do I Know When the Cheesecake Is Set?
The filling should feel firm enough to hold its shape before you add the topping or decoration.
Avoid decorating it while the filling is still soft, because the mango can sink into the surface.
Do I Have to Make the Mango Ribbon Decoration?
Not at all. The ribbon effect looks lovely, but diced mango is much quicker.
Simply cut the mango into chunks, arrange them over the set cheesecake and add a few fresh mint leaves if you like.

Tools You’ll Need
- 23 cm / 9-inch springform pan
- Baking or parchment paper
- Mini food processor or strong food bag for crushing the biscuits
- Small saucepan
- Mixing bowls
- Blender or hand blender
- Spatula
- Flat-bottomed glass or spoon for pressing the biscuit base
- Sharp knife for preparing the mango
Storage and Freezing
Keep the finished mango coconut cheesecake covered in an airtight container in the refrigerator. It will keep well for 4–5 days.
Freezing: The cheesecake can be frozen in an airtight container for up to 2 months. For the best appearance, freeze it before adding the fresh mango and mint decoration, then decorate it after it has thawed.
Nutrition
Serving: One slice.
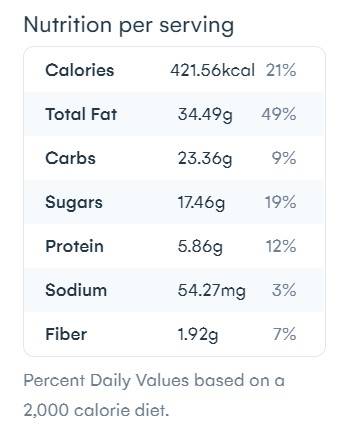
Nutrition information is provided as an estimate and may vary depending on the ingredients and portion size used.
Mango Coconut Cheesecake
- 23cm / 9inch springform pan
INGREDIENTS LIST
Biscuit base
- 100 g butter (melted)
- 200 g digestif or coconut biscuits
Filling
- 250 g mango (1 large piece)
- 1 tbsp lemon juice
- 300 ml coconut milk
- 250 g mascarpone
- 60 g caster sugar
- 1 tsp pure vanilla extract or 1/4 tsp of vanilla paste (sugar or 1/4 tsp of vanilla paste)
- 6 sheets gelatine (see notes)
Topping
- 100 ml coconut milk (see notes)
- 1 sheet gelatine (or 1/2 tsp powdered gelatine)
- 1 large mango (sliced or cut into chunks – optional)
- 6 pieces mint leaves or tips (optional)
Preparation
- Biscuit base: melt the butter in a small saucepan or a microwave. Put the biscuits into a mini food processor or ziplock bag and crush them until they resemble coarse bread crumbs.
- In a bowl, combine crushed biscuits and melted butter.
- Line a 23cm (9inch) springform pan with baking/parchment paper to stop the cheesecake sticking to it.Then pour the biscuit crumbs into the pan, pressing down with a back of a spoon or the bottom of a flat-bottomed tumbler to create an even layer over the base of the pan.
- Place the pan into the fridge to set the crust.
- In a small bowl soak the gelatine in some cold water for 5-6 minutes.
- Filling: peel and remove the stone from a large mango. Pulp the mango flesh and the lemon juice in a blender or use a hand blender in a large bowl.
- Add the coconut milk (reserving 100ml for the topping), mascarpone, sugar and vanilla to the bowl or blender and mix again to get a nice smooth mixture.
- Pour about a cup's worth (250ml) of the mixture into a small pan and gently heat it, but do not let it boil. Meanwhile remove the gelatine and squeeze out any excess water from it. Once the mixture is hot, remove it from the heat and stir in the gelatine until it completely dissolves.
- Add the warn gelatine mixture to the rest of the mix and blend again or simply stir well. Then remove the pan from the fridge and pour the mixture over the biscuit base.Place the pan back into the fridge for 2-3 hours until set.
- Topping: Once the cake has had time to cool and is set, make the topping. See notes.In a small bowl soak the gelatine in some cold water for 5-6 minutes.
- Gently heat the remaining 100ml of coconut milk in a small saucepan until hot but not boiling. Remove the gelatine and squeeze out any excess water from it. Once the milk is hot, remove it from the heat and stir in the gelatine until it completely dissolves.
- Pour the coconut milk mixture over the top of the cake and place it back in the fridge to set for 30 minutes.
- To decorate: Peel and slice the mango in half, making sure to avoid the stone in the middle. Slice each half into strips.
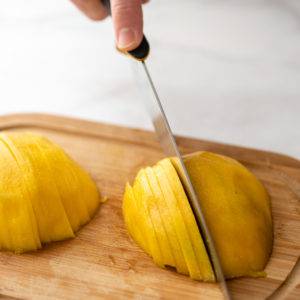
- Then take a slice and gently fold it in half, place it around the edge of the cake. Continue to place slices around and on top of each other to make a pattern.
- Alternatively, dice the mango into large cubes to decorate and add some fresh mint tips to finish.
Notes & Tips
FROM MY KITCHEN TO YOURS
Made this recipe?
I would love to hear how it turned out. Leave a comment and add a star rating to help other home cooks discover the recipe.
A recipe worth keeping
Save this recipe for another day
Pin it to one of your boards and keep it close for the next time you are ready to cook or bake.
Save to PinterestKeep cooking
You may also like
 Recipe
Chocolate Chia Pudding
A creamy vegan chocolate chia pudding topped with rich hazelnut fudge sauce for a simple, satisfying dessert or breakfast.
View recipe Recipe
Lemon Crinkle Cookies
Soft lemon crinkle cookies with snowy cracked tops and a bright, refreshing citrus flavour.
View recipe Recipe
Coffee & Walnut Loaf Cake
A moist coffee and walnut loaf cake finished with a smooth espresso and vanilla glaze.
View recipe
Around the table
Questions and kitchen notes
Made this recipe? Leave a rating and tell me how it turned out. Your questions and tips may also help the next person making it.